第1章 Hello驱动(不涉及硬件操作)
我们选用的内核都是4.x版本,操作都是类似的:
- rk3399 linux 4.4.154
- rk3288 linux 4.4.154
- imx6ul linux 4.9.88
- am3358 linux 4.9.168
1.1 APP打开的文件在内核中如何表示
APP打开文件时,可以得到一个整数,这个整数被称为文件句柄。对于APP的每一个文件句柄,在内核里面都有一个“struct file”与之对应。
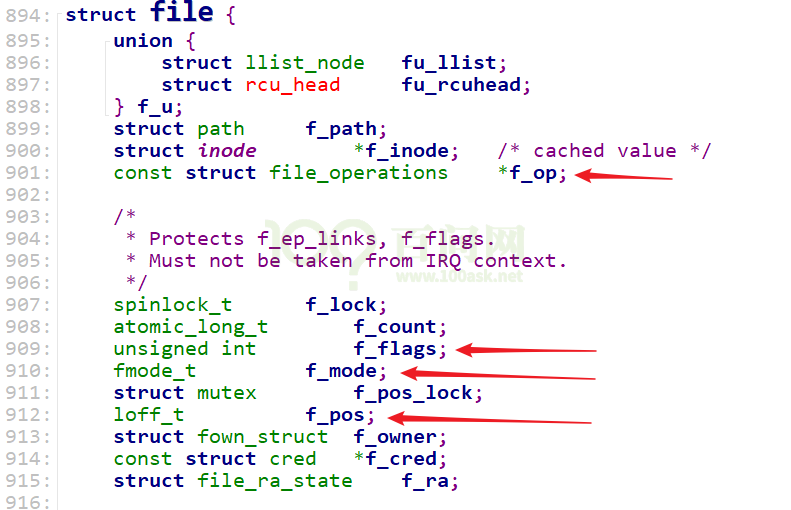
图 1.1 struct file
可以猜测,我们使用open打开文件时,传入的flags、mode等参数会被记录在内核中对应的struct file结构体里(f_flags、f_mode):
int open(const char *pathname, int flags, mode_t mode);
去读写文件时,文件的当前偏移地址也会保存在struct file结构体的f_pos成员里。
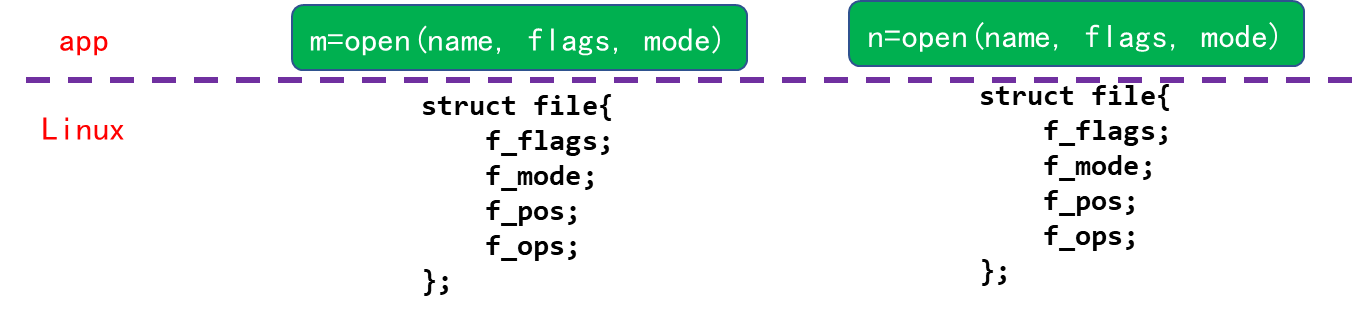
图 1.2 open->struct file
1.2 打开字符设备节点时,内核中也有对应的struct file
注意这个结构体中的结构体:struct file_operations *f_op,这是由驱动程序提供的。
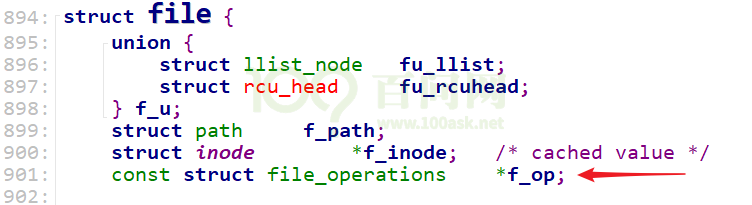
图 1.3 驱动程序的struct file
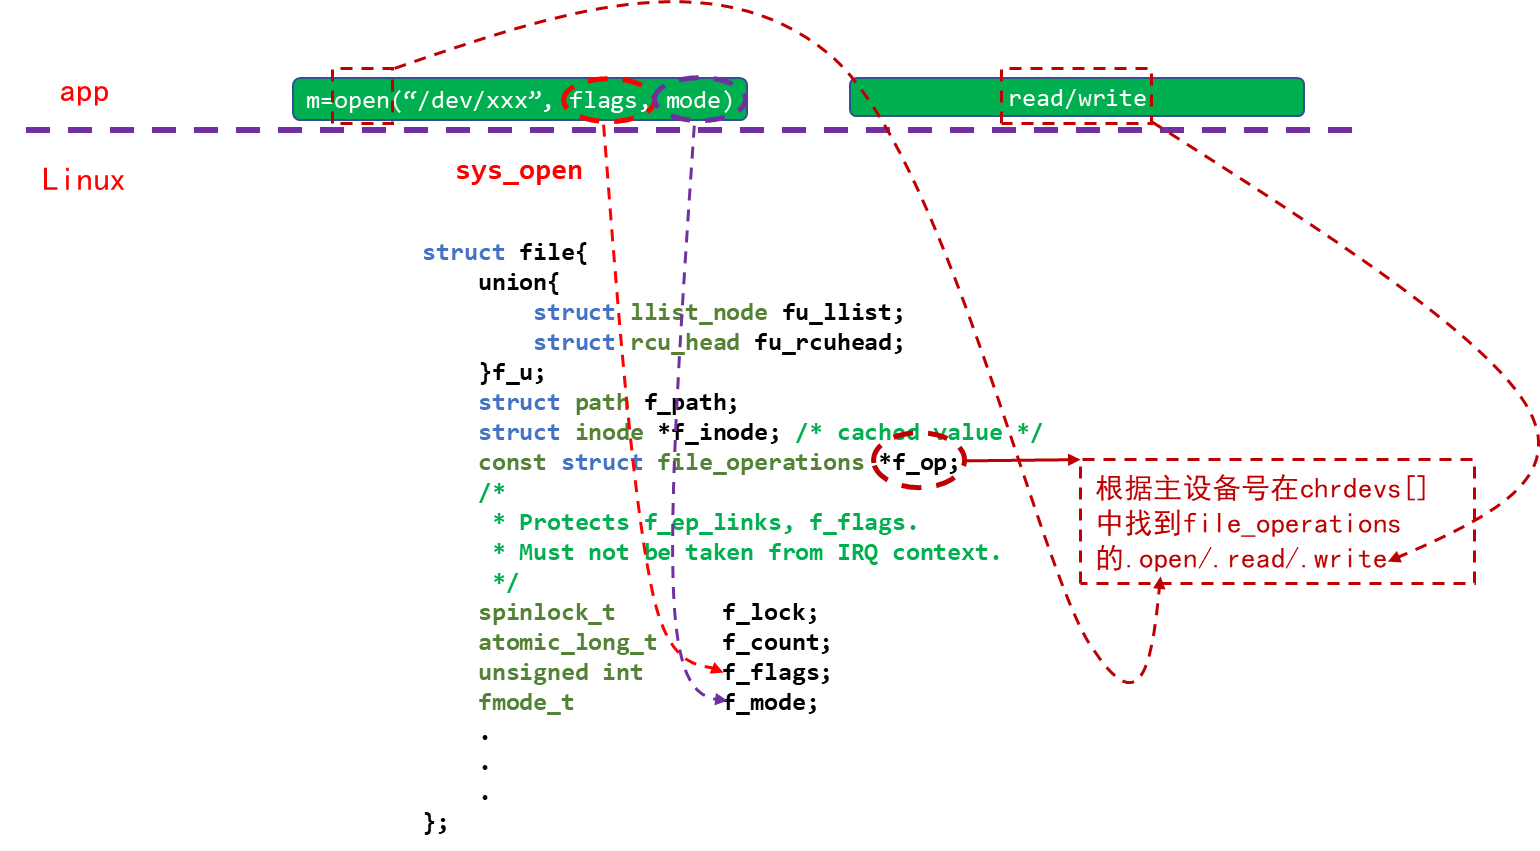
图 1.4 驱动程序的open/read/write
结构体struct file_operations的定义如下:
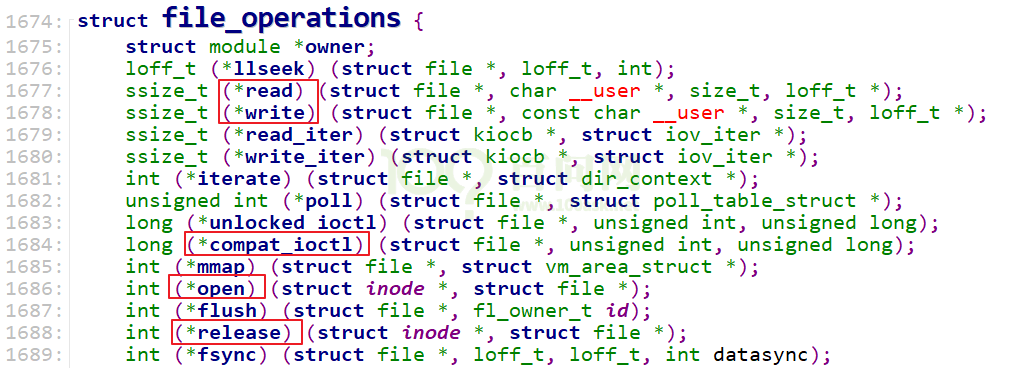
图 1.5 struct file_operations的定义
1.3 请猜猜怎么编写驱动程序
- 确定主设备号,也可以让内核分配
- 定义自己的file_operations结构体
- 实现对应的drv_open/drv_read/drv_write等函数,填入file_operations结构体
- 把file_operations结构体告诉内核:register_chrdev
- 谁来注册驱动程序啊?得有一个入口函数:安装驱动程序时,就会去调用这个入口函数
- 有入口函数就应该有出口函数:卸载驱动程序时,出口函数调用unregister_chrdev
- 其他完善:提供设备信息,自动创建设备节点:class_create, device_create
1.4 编写代码
1.4.1 写驱动程序
参考driver/char中的程序,包含头文件,写框架,传输数据:
- 驱动中实现open, read, write, release,APP调用这些函数时,都打印内核信息
- APP调用write函数时,传入的数据保存在驱动中
- APP调用read函数时,把驱动中保存的数据返回给APP
使用GIT下载所有源码后,本节源码位于如下目录:
01_all_series_quickstart\
05_嵌入式Linux驱动开发基础知识\source\01_hello_drv\hello_drv.c
hello_drv.c源码如下:
01 #include <linux/module.h>
02
03 #include <linux/fs.h>
04 #include <linux/errno.h>
05 #include <linux/miscdevice.h>
06 #include <linux/kernel.h>
07 #include <linux/major.h>
08 #include <linux/mutex.h>
09 #include <linux/proc_fs.h>
10 #include <linux/seq_file.h>
11 #include <linux/stat.h>
12 #include <linux/init.h>
13 #include <linux/device.h>
14 #include <linux/tty.h>
15 #include <linux/kmod.h>
16 #include <linux/gfp.h>
17
18 /* 1. 确定主设备号 */
19 static int major = 0;
20 static char kernel_buf[1024];
21 static struct class *hello_class;
22
23
24 #define MIN(a, b) (a < b ? a : b)
25
26 /* 3. 实现对应的open/read/write等函数,填入file_operations结构体 */
27 static ssize_t hello_drv_read (struct file *file, char __user *buf, size_t size, loff_t *offset)
28 {
29      int err;
30      printk("%s %s line %d\n", __FILE__, __FUNCTION__, __LINE__);
31      err = copy_to_user(buf, kernel_buf, MIN(1024, size));
32      return MIN(1024, size);
33 }
34
35 static ssize_t hello_drv_write (struct file *file, const char __user *buf, size_t size, loff_t *offset)
36 {
37      int err;
38      printk("%s %s line %d\n", __FILE__, __FUNCTION__, __LINE__);
39      err = copy_from_user(kernel_buf, buf, MIN(1024, size));
40      return MIN(1024, size);
41 }
42
43 static int hello_drv_open (struct inode *node, struct file *file)
44 {
45      printk("%s %s line %d\n", __FILE__, __FUNCTION__, __LINE__);
46      return 0;
47 }
48
49 static int hello_drv_close (struct inode *node, struct file *file)
50 {
51      printk("%s %s line %d\n", __FILE__, __FUNCTION__, __LINE__);
52      return 0;
53 }
54
55 /* 2. 定义自己的file_operations结构体 */
56 static struct file_operations hello_drv = {
57      .owner   = THIS_MODULE,
58      .open    = hello_drv_open,
59      .read    = hello_drv_read,
60      .write   = hello_drv_write,
61      .release = hello_drv_close,
62 };
63
64 /* 4. 把file_operations结构体告诉内核:注册驱动程序 */
65 /* 5. 谁来注册驱动程序啊?得有一个入口函数:安装驱动程序时,就会去调用这个入口函数 */
66 static int __init hello_init(void)
67 {
68      int err;
69
70      printk("%s %s line %d\n", __FILE__, __FUNCTION__, __LINE__);
71      major = register_chrdev(0, "hello", &hello_drv);  /* /dev/hello */
72
73
74      hello_class = class_create(THIS_MODULE, "hello_class");
75      err = PTR_ERR(hello_class);
76      if (IS_ERR(hello_class)) {
77              printk("%s %s line %d\n", __FILE__, __FUNCTION__, __LINE__);
78              unregister_chrdev(major, "hello");
79              return -1;
80      }
81
82      device_create(hello_class, NULL, MKDEV(major, 0), NULL, "hello"); /* /dev/hello */
83
84      return 0;
85 }
86
87 /* 6. 有入口函数就有出口函数:卸载驱动程序时就会去调用这个出口函数 */
88 static void __exit hello_exit(void)
89 {
90      printk("%s %s line %d\n", __FILE__, __FUNCTION__, __LINE__);
91      device_destroy(hello_class, MKDEV(major, 0));
92      class_destroy(hello_class);
93      unregister_chrdev(major, "hello");
94 }
95
96
97 /* 7. 其他完善:提供设备信息,自动创建设备节点 */
98
99 module_init(hello_init);
100 module_exit(hello_exit);
101
102 MODULE_LICENSE("GPL");
103
阅读一个驱动程序,从它的入口函数开始,第66行就是入口函数。它的主要工作就是第71行,向内核注册一个file_operations结构体:hello_drv,这就是字符设备驱动程序的核心。
file_operations结构体hello_drv在第56行定义,里面提供了open/read/write/release成员,应用程序调用open/read/write/close时就会导致这些成员函数被调用。
file_operations结构体hello_drv中的成员函数都比较简单,大多数只是打印而已。要注意的是,驱动程序和应用程序之间传递数据要使用copy_from_user/copy_to_user函数。
1.4.2 写测试程序
测试程序要实现写、读功能:
./hello_drv_test  -w  www.100ask.net  // 把字符串“www.100ask.net”发给驱动程序
./hello_drv_test  -r                  // 把驱动中保存的字符串读回来
使用GIT下载所有源码后,本节源码位于如下目录:
01_all_series_quickstart\
05_嵌入式Linux驱动开发基础知识\source\01_hello_drv\hello_drv_test.c
hello_drv_test.c源码如下:
02 #include <sys/types.h>
03 #include <sys/stat.h>
04 #include <fcntl.h>
05 #include <unistd.h>
06 #include <stdio.h>
07 #include <string.h>
08
09 /*
10  * ./hello_drv_test -w abc
11  * ./hello_drv_test -r
12  */
13 int main(int argc, char **argv)
14 {
15      int fd;
16      char buf[1024];
17      int len;
18
19      /* 1. 判断参数 */
20      if (argc < 2)
21      {
22              printf("Usage: %s -w <string>\n", argv[0]);
23              printf("       %s -r\n", argv[0]);
24              return -1;
25      }
26
27      /* 2. 打开文件 */
28      fd = open("/dev/hello", O_RDWR);
29      if (fd == -1)
30      {
31              printf("can not open file /dev/hello\n");
32              return -1;
33      }
34
35      /* 3. 写文件或读文件 */
36      if ((0 == strcmp(argv[1], "-w")) && (argc == 3))
37      {
38              len = strlen(argv[2]) + 1;
39              len = len < 1024 ? len : 1024;
40              write(fd, argv[2], len);
41      }
42      else
43      {
44              len = read(fd, buf, 1024);
45              buf[1023] = '\0';
46              printf("APP read : %s\n", buf);
47      }
48
49      close(fd);
50
51      return 0;
52 }
1.4.3 测试
- 编写驱动程序的Makefile
驱动程序中包含了很多头文件,这些头文件来自内核,不同的ARM板它的某些头文件可能不同。所以编译驱动程序时,需要指定板子所用的内核的源码路径。
要编译哪个文件?这也需要指定,设置obj-m变量即可
怎么把.c文件编译为驱动程序.ko?这要借助内核的顶层Makefile。
本驱动程序的Makefile内容如下:
02 # 1. 使用不同的开发板内核时, 一定要修改KERN_DIR
03 # 2. KERN_DIR中的内核要事先配置、编译, 为了能编译内核, 要先设置下列环境变量:
04 # 2.1 ARCH,          比如: export ARCH=arm64
05 # 2.2 CROSS_COMPILE, 比如: export CROSS_COMPILE=aarch64-linux-gnu-
06 # 2.3 PATH,          比如: export PATH=$PATH:/home/book/100ask_roc-rk3399-pc/ToolChain-6.3.1/gcc-linaro-6.3.1-2017.05-x86_64_aarch64-linux-gnu/bin
07 # 注意: 不同的开发板不同的编译器上述3个环境变量不一定相同,
08 #       请参考各开发板的高级用户使用手册
09
10 KERN_DIR = /home/book/100ask_roc-rk3399-pc/linux-4.4
11
12 all:
13      make -C $(KERN_DIR) M=`pwd` modules
14      $(CROSS_COMPILE)gcc -o hello_drv_test hello_drv_test.c
15
16 clean:
17      make -C $(KERN_DIR) M=`pwd` modules clean
18      rm -rf modules.order
19      rm -f hello_drv_test
20
21 obj-m        += hello_drv.o
先设置好交叉编译工具链,编译好你的板子所用的内核,然后修改Makefile指定内核源码路径,最后即可执行make命令编译驱动程序和测试程序。
- 上机实验
注意:我们是在Ubuntu中编译程序,但是需要在ARM板子上测试。所以需要把程序放到ARM板子上。
启动单板后,在Ubuntu上使用adb命令下载程序到开发板,执行如下命令:
adb  push  *.ko   /root
adb  push  hello_drv_test   /root
在ARM板上测试:
[root@100ask:~]# echo "7 4 1 7" > /proc/sys/kernel/printk  // 打开内核的打印信息,有些板子默认打开了
[root@100ask:~]# cd  /root
[root@100ask:~]# insmod hello_drv.ko    // 安装驱动程序
[  293.594910] hello_drv: loading out-of-tree module taints kernel.
[  293.616051] /home/book/source/01_hello_drv/hello_drv.c hello_init line 70
[root@100ask:~]# ls /dev/hello -l        // 驱动程序会生成设备节点
crw-------    1 root     root      236,   0 Jan 18 08:55 /dev/hello
[root@100ask:~]#./hello_drv_test        // 查看测试程序的用法
Usage: ./hello_drv_test -w <string>
       ./hello_drv_test -r
[root@100ask:~]#./hello_drv_test -w www.100ask.net    // 往驱动程序中写入字符串
[  318.360800] /home/book/source/01_hello_drv/hello_drv.c hello_drv_open line 45
[  318.372570] /home/book/source/01_hello_drv/hello_drv.c hello_drv_write line 38
[  318.382854] /home/book/source/01_hello_drv/hello_drv.c hello_drv_close line 51
[root@100ask:~]#./hello_drv_test -r                  // 从驱动程序中读出字符串
[  326.177890] /home/book/source/01_hello_drv/hello_drv.c hello_drv_open line 45
[  326.198304] /home/book/source/01_hello_drv/hello_drv.c hello_drv_read line 30
[root@100ask:~]# APP read : www.100ask.net
[  326.214782] /home/book/source/01_hello_drv/hello_drv.c hello_drv_close line 51
1.5 Hello驱动中的一些补充知识
1.5.1 module_init/module_exit的实现
一个驱动程序有入口函数、出口函数,代码如下:
module_init(hello_init);
module_exit(hello_exit);
驱动程序可以被编进内核里,也可以被编译为ko文件后手工加载。对于这两种形式,“module_init/module_exit”这2个宏是不一样的。在内核文件“include\linux\module.h”中可以看到这2个宏:
01 #ifndef MODULE
02
03 #define module_init(x)    __initcall(x);
04 #define module_exit(x)    __exitcall(x);
05
06 #else /* MODULE */
07
08 #define module_init(initfn)                 \
09
10 /* Each module must use one module_init(). */
11     static inline initcall_t __inittest(void)       \
12     { return initfn; }                  \
13     int init_module(void) __attribute__((alias(#initfn)));
14
15 /* This is only required if you want to be unloadable. */
16 #define module_exit(exitfn)                 \
17     static inline exitcall_t __exittest(void)       \
18     { return exitfn; }                  \
19     void cleanup_module(void) __attribute__((alias(#exitfn)));
20
21 #endif
编译驱动程序时,我们执行“make modules”这样的命令,它在编译c文件时会定义宏MODULE,比如:
arm-buildroot-linux-gnueabihf-gcc -DMODULE -c -o hello_drv.o hello_drv.c
在编译内核时,并不会定义宏MODULE。所以,“module_init/module_exit”这2个宏在驱动程序被编进内核时,如上面代码中第3、4行那样定义;在驱动程序被编译为ko文件时,如上面代码中第11~19行那样定义。
把上述代码里的宏全部展开后,得到如下代码:
01 #ifndef MODULE
01
01 #define module_init(fn)
02     static initcall_t __initcall_##fn##id __used \
03 __attribute__((__section__(".initcall" #6 ".init"))) = fn;
04
05 #define module_exit(x)    static exitcall_t __exitcall_##x __used __section(.exitcall.exit) = x;
06
07 #else /* MODULE */
08
09 #define module_init(initfn)                 \
10
11 /* Each module must use one module_init(). */
12     static inline initcall_t __inittest(void)       \
13     { return initfn; }                  \
14     int init_module(void) __attribute__((alias(#initfn)));
15
16 /* This is only required if you want to be unloadable. */
17 #define module_exit(exitfn)                 \
18     static inline exitcall_t __exittest(void)       \
19     { return exitfn; }                  \
20     void cleanup_module(void) __attribute__((alias(#exitfn)));
21
22 #endif
驱动程序被编进内核时,把“module_init(hello_init)”、“module_exit(hello_exit)”展开,得到如下代码:
static initcall_t __initcall_hello_init6 __used \
__attribute__((__section__(".initcall6.init"))) = hello_init;
static exitcall_t __exitcall_hello_exit  __used __section(.exitcall.exit) = hello_exit;
其中的“initcall_t”、“exitcall_t”就是函数指针类型,所以上述代码就是定义了两个函数指针:第1个函数指针名为__initcall_hello_init6,放在段".initcall6.init"里;第2个函数指针名为__exitcall_hello_exit,放在段“.exitcall.exit”里。
内核启动时,会去段".initcall6.init"里取出这些函数指针来执行,所以驱动程序的入口函数就被执行了。
一个驱动被编进内核后,它是不会被卸载的,所以段“.exitcall.exit”不会被用到,内核启动后会释放这块段空间。
驱动程序被编译为ko文件时,把“module_init(hello_init)”、“module_exit(hello_exit)”展开,得到如下代码:
static inline initcall_t __inittest(void)       \
{ return hello_init; }                  \
int init_module(void) __attribute__((alias("hello_init")));
static inline exitcall_t __exittest(void)       \
{ return hello_exit; }                  \
void cleanup_module(void) __attribute__((alias("hello_exit")));
分别定义了2个函数:第1个函数名为init_module,它是hello_init函数的别名;第2个函数名为cleanup_module,它是hello_exit函数的别名。
以后我们使用insmod命令加载驱动时,内核都是调用init_module函数,实际上就是调用hello_init函数;使用rmmod命令卸载驱动时,内核都是调用cleanup_module函数,实际上就是调用hello_exit函数。
1.5.2 register_chrdev的内部实现
register_chrdev函数源码如下:
static inline int register_chrdev(unsigned int major, const char *name,
                  const struct file_operations *fops)
{
    return __register_chrdev(major, 0, 256, name, fops);
}
它调用__register_chrdev函数,这个函数的代码精简如下:
01 int __register_chrdev(unsigned int major, unsigned int baseminor,
02               unsigned int count, const char *name,
03               const struct file_operations *fops)
04 {
05     struct char_device_struct *cd;
06     struct cdev *cdev;
07     int err = -ENOMEM;
08
09     cd = __register_chrdev_region(major, baseminor, count, name);
10
11     cdev = cdev_alloc();
12
13     cdev->owner = fops->owner;
14     cdev->ops = fops;
15     kobject_set_name(&cdev->kobj, "%s", name);
16
17     err = cdev_add(cdev, MKDEV(cd->major, baseminor), count);
18 }
这个函数主要的代码是第09行、第11~15行、第17行。
第09行,调用__register_chrdev_region函数来“注册字符设备的区域”,它仅仅是查看设备号(major, baseminor)到(major, baseminor+count-1)有没有被占用,如果未被占用的话,就使用这块区域。
在前面的课程里,在引入驱动程序时为了便于理解,我们说内核里有一个chrdevs数组,根据主设备号major在chrdevs[major]中放入file_operations结构体,以后open/read/write某个设备文件时,就是根据主设备号从chrdevs[major]中取出file_operations结构体,调用里面的open/read/write函数指针。
上述说法并不准确,内核中确实有一个chrdevs数组:
static struct char_device_struct {
    struct char_device_struct *next;
    unsigned int major;
    unsigned int baseminor;
    int minorct;
    char name[64];
    struct cdev *cdev;      /* will die */
} *chrdevs[CHRDEV_MAJOR_HASH_SIZE];
去访问它的时候,并不是直接使用主设备号major来确定数组项,而是使用如下函数来确定数组项:
/* index in the above */
static inline int major_to_index(unsigned major)
{
    return major % CHRDEV_MAJOR_HASH_SIZE;
}
上述代码中,CHRDEV_MAJOR_HASH_SIZE等于255。比如主设备号1、256,都会使用chardevs[1]。chardevs[1]是一个链表,链表里有多个char_device_struct结构体,某个结构体表示主设备号为1的设备,某个结构体表示主设备号为256的设备。
chardevs的结构图如图2.6所示:
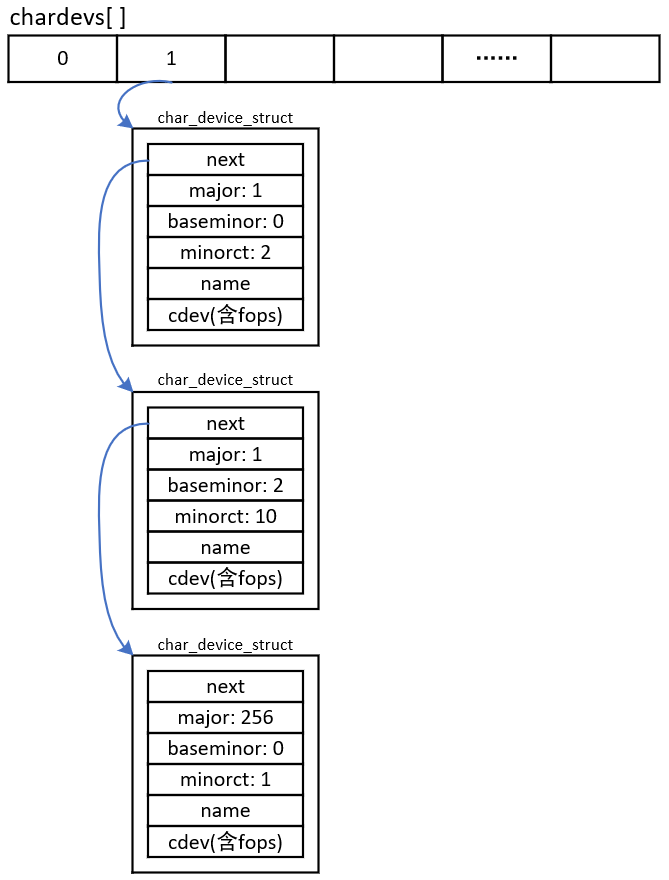
图 1.6 chardevs结构图
从图2.6可以得出如下结论:
① chrdevs[i]数组项是一个链表头
链表里每一个元素都是一个char_device_struct结构体,每个元素表示一个驱动程序。
char_device_struct结构体内容如下:
struct char_device_struct {
    struct char_device_struct *next;
    unsigned int major;
    unsigned int baseminor;
    int minorct;
    char name[64];
    struct cdev *cdev;      /* will die */
}
它指定了主设备号major、次设备号baseminor、个数minorct,在cdev中含有file_operations结构体。
char_device_struct结构体的含义是:主次设备号为(major, baseminor)、(major, baseminor+1)、(major, baseminor+2)、(major, baseminor+ minorct-1)的这些设备,都使用同一个file_operations来操作。
以前为了更容易理解驱动程序时,说“内核通过主设备号找到对应的file_operations结构体”,这并不准确。应该改成:“内核通过主、次设备号,找到对应的file_operations结构体”。
② 在图2.6中,chardevs[1]中有3个驱动程序
第1个char_device_struct结构体对应主次设备号(1, 0)、(1, 1),这是第1个驱动程序。
第2个char_device_struct结构体对应主次设备号(1, 2)、(1, 2)、……、(1, 11),这是第2个驱动程序。
第3个char_device_struct结构体对应主次设备号(256, 0),这是第3个驱动程序。
第11~15行分配一个cdev结构体,并设置它:它含有file_operations结构体。
第17行调用cdev_add把cdev结构体注册进内核里,cdev_add函数代码如下:
01 int cdev_add(struct cdev *p, dev_t dev, unsigned count)
02 {
03     int error;
04
05     p->dev = dev;
06     p->count = count;
07
08     error = kobj_map(cdev_map, dev, count, NULL,
09              exact_match, exact_lock, p);
10     if (error)
11         return error;
12
13     kobject_get(p->kobj.parent);
14
15     return 0;
16 }
这个函数涉及kobj的操作,这是一个通用的链表操作函数。它的作用是:把cdev结构体放入cdev_map链表中,对应的索引值是“dev”到“dev+count-1”。以后可以从cdev_map链表中快速地使用索引值取出对应的cdev。
比如执行以下代码:
err = cdev_add(cdev, MKDEV(1, 2), 10);
其中的MKDEV(1,2)构造出一个整数“1<<8 | 2”,即0x102;上述代码将cdev放入cdev_map链表中,对应的索引值是0x102到0x10c(即0x102+10)。以后根据这10个数值(0x102、0x103、0x104、……、0x10c)中任意一个,都可以快速地从cdev_map链表中取出cdev结构体。
APP打开某个字符设备节点时,进入内核。在内核里根据字符设备节点的主、次设备号,计算出一个数值(major<<8 | minor,即inode->i_rdev),然后使用这个数值从cdev_map中快速得到cdev,再从cdev中得到file_operations结构体。
关键函数如下:
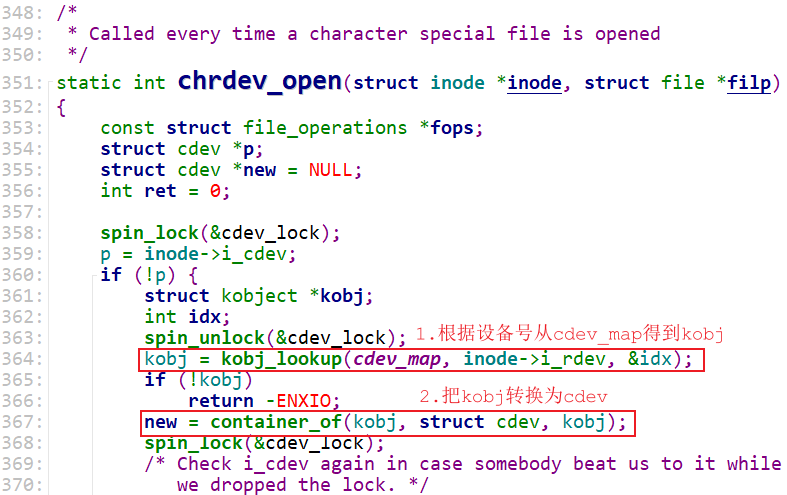
图 1.7找到驱动程序的关键函数
在打开文件的过程中,可以看到并未涉及chrdevs,都是使用cdev_map。所以可以看到在chrdevs的定义中看到如下注释:
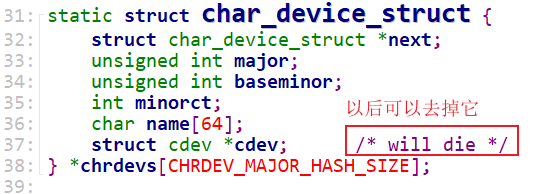
图 1.8 chardevs中cdev的作用并不大
1.5.3 class_destroy/device_create浅析
驱动程序的核心是file_operations结构体:分配、设置、注册它。“class_destroy/device_create”函数知识起一些辅助作用:在/sys目录下创建一些目录、文件,这样Linux系统中的APP(比如udev、mdev)就可以根据这些目录或文件来创建设备节点。
以下代码将会在“/sys/class”目录下创建一个子目录“hello_class”:
hello_class = class_create(THIS_MODULE, "hello_class");
以下代码将会在“/sys/class/hello_class”目录下创建一个文件“hello”:
device_create(hello_class, NULL, MKDEV(major, 0), NULL, "hello");
更详细的信息请看图2.9:
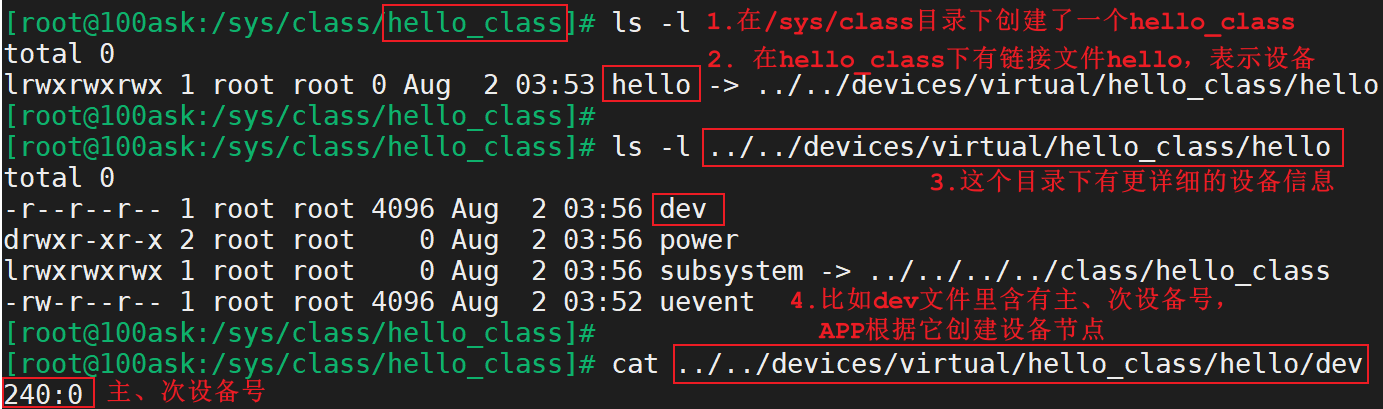
图 1.9 class和device